


So, it’s been a busy month and a bit!
New Entrance Hall, Butler NPC using CostumeParts, and the new DialogueGraph system.
First things first, the new entrance hall has been implemented. Unfortunately it took a lot longer to do than anticipated (So many stairs and railings to unwrap), but I think I managed to get the look I was going for, which was mostly ‘large and decadent’. One thing which I also didn’t factor in was the time required to get the room generation code to support multiple floors, which took a couple of days. Adding an extra dimension can cause all kinds of code bugs and headaches.
Since I was running so behind, I didn’t get a chance to redo the hallway environments or implement special rooms (Bedrooms, kitchens, bathrooms) as of yet, so they’ve been pushed back to next month.
The priority at the moment is to get the murder mystery part of the game implemented so I can have a full game loop going. A big part of that is implementing NPCs (Non-Playable Characters) so I can populate the mansion with suspects for the murder. However, modelling characters from scratch takes *forever*, and due to several limitations I can’t share animations between multiple characters, so I had to come up with a solution on how I could get multiple characters looking unique while still using the same mesh.
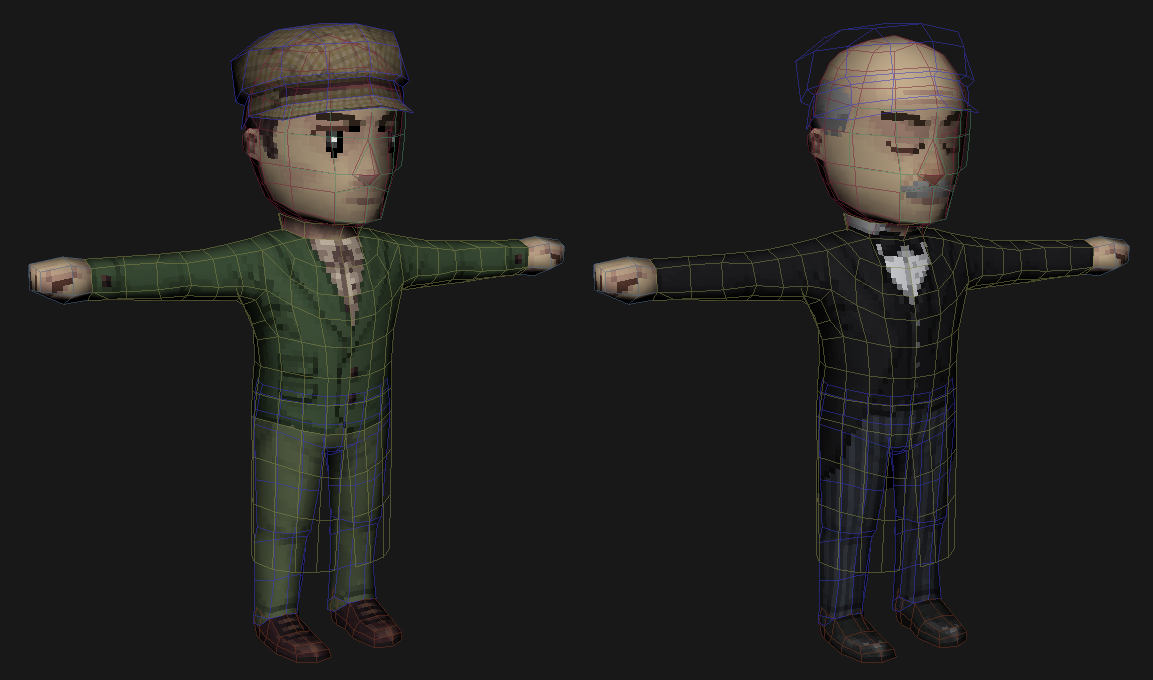
Detective and Butler sharing the same mesh
The solution I came up with was to make a model that can support multiple character types, with ‘CostumeParts’ that can enable/disable certain parts of the mesh and use a different texture for each part. So of the pieces can also be reused for different variations of clothing; as you can see in the image above, the detective only has a short coat, but the coat mesh extends almost down to his knees. The green jacket texture has invisible pixels all over the bottom half of the mesh, while the butler uses the extended part of the coat mesh in order to have longer tails. Same goes for the top of the collar; the Butler uses it to show the bow-tie and extended collar, while the detective doesn’t use it at all.
By default, all meshes on a character are hidden, and when a CostumePart is equipped, it will show the mesh defined by the costume and set the material of the mesh to whatever the CostumePart has defined. With the hat, for example, it defaults to hidden unless a particular CostumePart that uses the hat is equipped. This means that the model that’s actually used in the game actually contains all possible outfits at once, but they’re just hidden and exposed as needed.
This may end up being incredibly expensive in the future, in which case I’ll be changing the system to only instantiate meshes as needed, so there aren’t a tonne of disabled meshes hanging around.
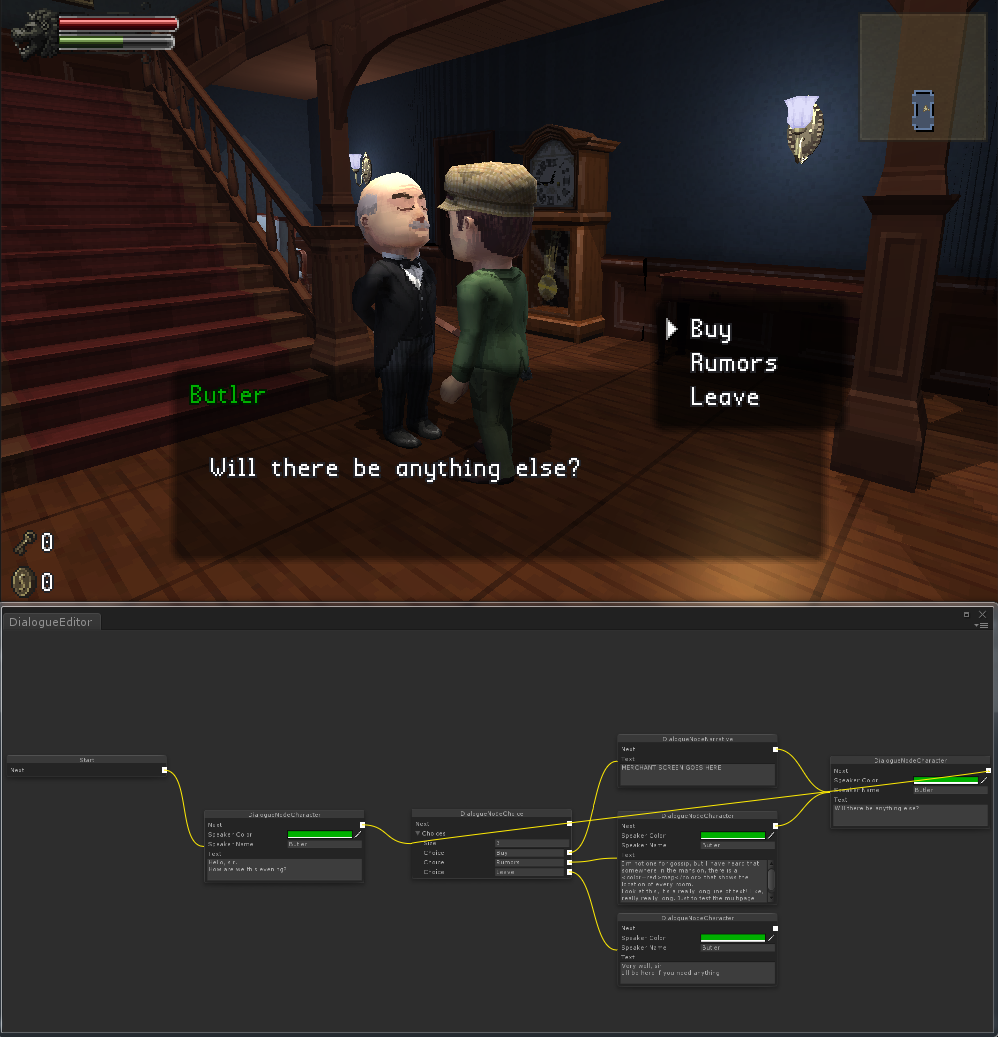
The other major thing that’s been added this month is editable dialogue trees. Previously all dialogue was code-driven, which meant that every time I wanted to change what a character had to say, I had to change the code directly. I made a generic node editor for Unity, so that I can create and delete nodes as well as wire them up and get a visual representation of what the dialogue tree looks like. I also added the ability to have multiple-choice dialogue sections, so you can ask a character something and go down a different branch of the dialogue tree.
Making the node editor was a much larger undertaking than I was expecting, mostly due to being inexperienced with the way Unity deals with serialization (Saving/Loading data from disk). Unity doesn’t support serialization of polymorphic arrays by default, and the default serialization of classes saves them all inline, so if one node links to another, it will actually save/load a copy of that node rather than the actual node itself. While in-game you wouldn’t really notice the difference, if I changed one of the nodes in Unity then saved and reopened the project, I’d have several nodes that would have been duplicated, causing a massive headache if I wanted to go in and edit one of the nodes.
The way around this was to have my IDialogueNode interface inherit off ScriptableObject, then create each node via ScriptableObject.CreateInstance, then add the node to the DialogueGraph by calling AssetDatabase.AddObjectToAsset. This means that the DialogueGraph itself actually contains several objects rather than just one, which has the annoying side-effect of causing the DialogueGraph to be displayed in the project view as multiple objects which can be annoying to work with. Although if you set the hideFlags of each node to HideFlags.HideInHierarchy, then Unity will only show the unhidden ScriptableObjects in the project view, meaning that only the DialogueGraph (The original asset) will be displayed.
So, now NPCs and dialogue have been properly implemented, the next steps are all about getting UI for the players inventory (As well as for the Buy screen on the butler), creating more CostumeParts, randomizing them onto other NPCs in the mansion, then creating the MysteryManager to deal with giving dialogue to the NPCs.
Woo, progress!